Win32Emu Blog Post for VirtuallyFun by CaptainWillStarblazer
The Idea
The idea for win32emu began shortly after the leak of an unreleased AXP64 version of Windows. This generated a great degree of excitement on the VirtuallyFun Discord server (and fundamentally a porting party where neozeed hosted his PWS over RDP for people to port applications, which I did). We had an SDK for the build with a compiler, but you needed an actual DEC Alpha machine running 32-bit Windows to run the SDK tools and then reboot it into 64-bit Windows to run any of your applications - there was no Intel cross compiler.
At time of writing, the only RISC versions of Windows that can be emulated are the MIPS R4000 version and the ARM versions from the 21st century. While there are Alpha and PowerPC emulators (including those for the machines with those CPUs that ran Windows NT), they have not yet progressed to the point of actually running Windows, and the hardware is expensive and hard to find (particularly for PowerPC and MIPS). My thought was to write a CPU emulator and tie it to a thunking layer that would allow the emulated process to call into the Win32 API on the host system, letting applications for another CPU run on Windows, in much the same way as the WoW subsystem. The project is actually most conceptually similar to win3mu, which tied an 80286 emulator to a Win16 thunk layer, but that was of course for Win16 and written in C#, while this is written in C and thunks Win32 (which makes some things harder and other things easier but shares the general idea: most emulated functions thunk pretty directly to host functions).
Attempt 1 and its Flaws
My first serious attempt at this project began in August 2023. Since the i386 processor was a known quantity (there was the most documentation on it compared to the RISC CPUs, and I was comfortable with it and its calling convention under Windows NT), I first wrote an i386 emulator core (while technically redundant on an x86/x64 machine, it still showcased the general premise as a proof-of-concept).
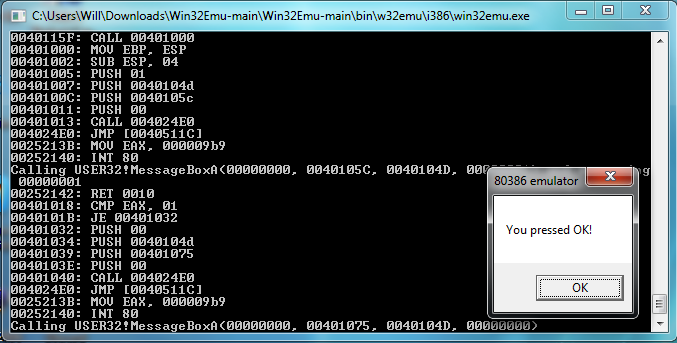
The system worked by a series of thunk DLLs for each core system DLL (i.e. USER32.DLL, KERNEL32.DLL, GDI32.DLL, etc.) that exported the core runtime functions. Inside each function (i.e. HeapAlloc), the EAX register was set to the syscall ID (a number I had chosen to represent HeapAlloc) and then INT 0x80 was executed - the syscall interrupt. The implementation for the interrupt instruction in the CPU emulator would check if the interrupt number was 0x80, and if it is, it uses the EAX register as the index into a thunk table (an array of function pointers with names like thunk_HeapAlloc). The function in the thunk table is executed, which usually pulls the parameters off of the emulated CPUs stack, passes them to the Windows function its thunking to, and returns the result. When the handle_syscall function returns, it sets its return value into the EAX register so the emulated process can see it.
The emulated 386 ran in its own sandboxed virtual memory space, and I emulated the page topology of the processor, mapping pages into its virtual memory, to access RAM. This was slow - a massive speed penalty, and prevented me from fully relying on the Windows memory management functions, or even accessing resources directly from an HMODULE (since theres a level of abstraction behind the pointer that that HMODULE represents).
My implementation had several other problems from the get-go: my incomplete implementation of the PE file format caused some issues with parsing (so it only worked on files with certain layouts that the Visual C++ 4.0 linker just happened to satisfy), writing a 386 emulator was no easy task, and several details of the inner-workings of the thunk layer were tied both to 386 processor and its calling convention. The code that dealt with callbacks (i.e. when Windows needs to call into the process, such as with a window procedure) was also quite nasty.
In spite of these issues, I did successfully get several basic applications to work. Even getting to main() (or WinMain) wasn't easy, and I had to single-step through the CRT startup routines, implementing unimplemented instructions, fixing bugs, and adding unimplemented imports.
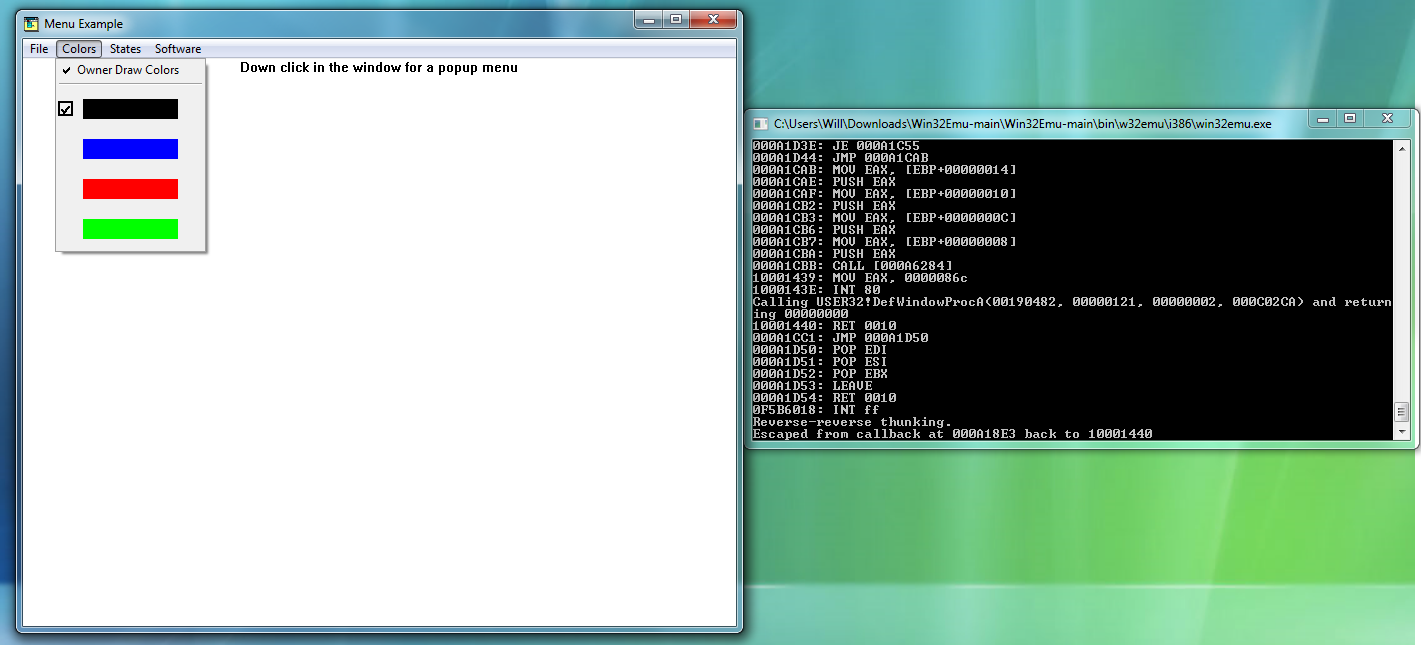
Eventually, I got Reversi to work (it was a sample in the Win32 SDK for Chicago build 73f), but absent any icons, text, or menus, due to the aforementioned issues with resources. After some more work writing my own functions to parse the resource directory, I got it all to work, including the About dialog box resource, but with one seemingly unsolvable issue: the dialog boxs icons were missing. Since the DialogBox function that I was thunking to takes in an HINSTANCE and uses that to resolve all of the icons referenced in the dialog box template, I couldnt make it work. Short of enumerating every icon in the dialog box and parsing the dialog template for the appropriate icon and then loading it manually, there was no real solution, and even that would be a kludge.
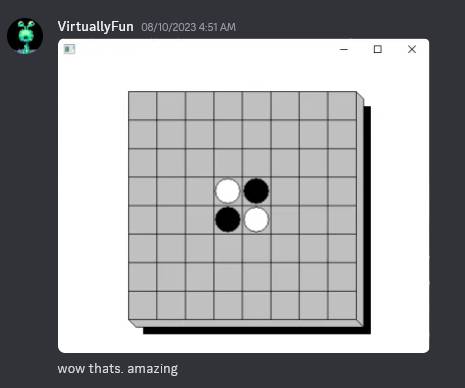
An early version of win32emu running a hacked version of Reversi note the lack of icon, menu, or title bar. Many nights stretched into the early mornings (read: 5-7AM) to make this possible. I had only been working on the project for a few days by this point, and a few days later, Id have gotten icons, menus, title bars, and dialog boxes working.
Indirecting memory access through a function (and two tables) was also extremely slow, as I said earlier. On a 3GHz Ryzen 9 4900HS laptop compiled with maximum optimizations, I got about 1 MIPS. I know that my code isnt the most efficiently optimized in the world, but I didnt think it could be that slow. Thats just not very usable, since even the most basic 386 running Windows NT 3.1 was faster.
Take Two
I let the project sit for a few months: a neat, but flawed proof-of-concept for something better executed by a better programmer. When November came, I had renewed plans for how I would do this, with the general idea being to make this cleaner and less hacky.
The main change would be in the memory management - the emulated CPU would access the hosts memory directly, with modules mapped directly into the hosts virtual memory address space. This had obvious speed advantages, but it also allowed me to use Windows functions (i.e. LoadString) to extract resources from an HMODULE, since the HMODULEs I load are the same as the Windows ones, and it lets me pass pointers that Windows allocates directly to the emulator. The caveat with this implementation is that it requires the address space of the emulator application to be the same as that of the CPU its emulating. Since every host virtual memory address has to be valid on the emulated CPU with no translation, this is a requirement. I compiled the emulator as a 32-bit application, but theoretically it could work on x64 with the /LARGEADDRESSAWARE:NO switch passed to the linker.
The DEC Alpha is an interesting case for this since by default, it runs Windows in a 32-bit address space - by calling convention, only the least-significant 32-bits of a pointer are important - all runtime functions truncate the pointers. This means that despite the Alpha having 64-bit registers and 64-bit operations, its emulator would also need to run in a 32-bit address space, but this is where the /LARGEADDRESSAWARE:NO switch can come in handy. Being a native x64 application had speed benefits for the 64-bit operations that the Alphas CPU performs, so you get the best of both worlds. Obviously, a hypothetical AXP64 implementation would reuse most of the emulator code, but run in a 64-bit address space. As of now, the application isnt 64-bit clean, but that work could definitely be done in the future.
Another major feature I added was abstracting away the thunking layer from the CPU, wrapping the CPU in an opaque data structure that included (among other things) a bunch of function pointers for operations that let the thunking layer communicate with the emulated CPU, such as getting and setting the return value, syscall ID, function arguments, program counter, stack pointer, etc. Crucially, this let me abstract away the calling convention as well - the differences between how MIPS and x86 Windows NT applications work isnt just the instruction set, the calling convention is also different. In __stdcall on the x86, the return value is in EAX, parameters are pushed onto the stack right-to-left, the return address is pushed onto the stack, and the callee cleans up the stack by popping off the arguments.
In contrast, on MIPS, when a function is called, the caller places $a0-a3 into a 16-byte home space, and then pushes all caller-preserved registers onto the stack. The SP is then decremented by 16 to allocate home space for the callee, the first four parameters are loaded into $a0-a3 (remaining parameters pushed onto the stack), the CPU jumps-and-links to the function address (putting the PC into RA), and return addresses are stored in a register (pushed in the function prologue and popped at the end before jumping to the RA register). After the function returns, stack space for parameters (including home space) is deallocated, caller-preserved registers are popped, and $a0-a3 are restored from home space.
After writing a few functions for dealing with PE files, I decided on the basic sequence of events to open an application. First, the emulator calls EmuInitProcess, passing in the executable name and command line string. EmuInitProcess allocates the PEB (Process Environment Block), and populates the ProcessParameters field with the image path name and the command line string. The executable image is then loaded using EmuLoadLibrary, which returns an HMODULE. EmuLoadLibrary will load any imported modules from the EXE. The process heap is created and a handle to it placed into the PEB, and then EmuCreateThread is called, passing in the start address (image base + image entry point), stack reserve, stack commit, and PEB pointer.
EmuCreateThread returns a pointer to a CPU data structure, allocating it, zeroing out the registers, and then allocating a TEB and setting it into the CPU. Using VirtualAlloc, the stack is allocated (both reserved and committed regions), and pointers to the top of the stack and the address of the lowest committed page are put into the TEB, as is a pointer to the TEB itself and the PEB. The CPUs stack pointer is then set to the stack top, and the instruction pointer is set to the passed-in start address, with the CPU now being ready for execution.
Reusing the 386 emulator from the previous attempt (with a few tweaks), I quickly started executing, having to reimplement thunks along the way. It wasn't long until I had a basic Hello World program using MessageBox working, and soon I was also at the point of creating a window in Reversi. However, the game didnt do anything, since I hadnt implemented callbacks yet, which tied into an issue I had (and kludged my way around) in the old implementation.
Before creating a window, one first registers a window class. Among other things, it has a class name (used to identify it) and a WndProc address. Obviously, the emulated window procedure cant run directly on the host, so I substitute in a thunk_WndProc which Windows actually calls, and then save the classname and WndProc into an internal map.
When one does get around to creating a window, they pass in the classname. The question, of course, is how the WndProc thunk knows which emulated WndProc to call. I quickly settled on an HWND-to-WndProc lookup table, but I dont have the HWND until CreateWindow returns, and the WndProc is called with a WM_CREATE message before then. The solution then was still to do an HWND-to-WndProc lookup. If a WndProc is found, thunk to that and return the result. If not, the window is still being created, so get the classname from the HWND, do a classname-to-WndProc lookup, then create an HWND-to-WndProc entry, and thunk to that WndProc.
The next implementation question was how to handle callback thunks. To avoid leaking stack bytes, I quickly settled on the the WndProc thunk pushing the function arguments (I used a varargs function to pass in arguments to account for different calling conventions). The WndProc thunk then returns the value of a call to ThunkCallback, which is passed the CPU context pointer and WndProc address.
ThunkCallback works a bit differently on different CPUs because of how return addresses are preserved differently on different architectures, but on the 386, it saves the current IP and callback depth, pushes the address of the escape vector as a return address and sets the CPU IP to the target address (i.e. the address of WndProc). The CPU callback depth is then incremented. A while loop then continually ticks the CPU while the current CPU callback depth is greater than the initial depth (found in the variable).
The way this works is that the WndProc is executed inside of the emulator, stuffs its return value in EAX or whatever, and then returns - to the escape vector. What the escape vector does is basically do an interrupt which decrements the callback depth. After performing the interrupt, the loop in ThunkCallback is escaped from and the old IP is set back, and then the thunk WndProc returns. After the thunk that called the window procedure (such as DispatchMessage) returns, youre soon back in emulated code. After the return instruction is executed, returning the CPU back to the return instruction in the DLL function following the syscall interrupt. That return instruction is then executed and the CPU is back into user code, with the return value cascading out across thunking layers.
More challenging was how to identify which CPU is calling the window procedure, since the WndProc thunk has a normal WndProc function signature with no space to pass a CPU pointer. In the past, this was a global variable, but I wanted to support multiple threads (which would each have their own CPU structure, and Id let the Windows scheduler manage the rest), so that wasn't an option. I couldnt think of a good solution, so I settled on adding an extra field to the HWND-to-WndProc table which contained a CPU pointer, and inside of the thunk for any Windows function which calls the window procedure, I then call LockWindow, passing in the HWND and CPU pointer (which the call thunk has access to), temporarily bonding the HWND to that CPU until another CPU steals it away. This should work for most applications since I doubt multiple threads usually share an HWND (at least with respect to window procedures). Any Win32 message loop is likely to stay confined to one thread, calling DispatchMessage.
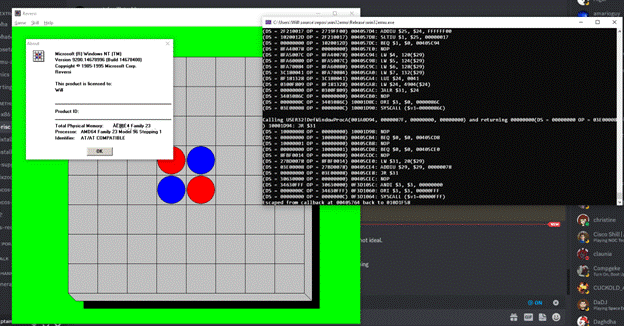
Reversi is nice because its essentially the simplest complete, interactive windows app you can have. As such, it made a good test case. Getting to the point of creating the window was just a matter of implementing the necessary imports, but after that, it hung since I hadnt implemented callbacks yet. After I did, it was just a matter of adding a few more imports and Reversi was working perfectly. The CPU emulation was also significantly faster than before - perfectly usable.
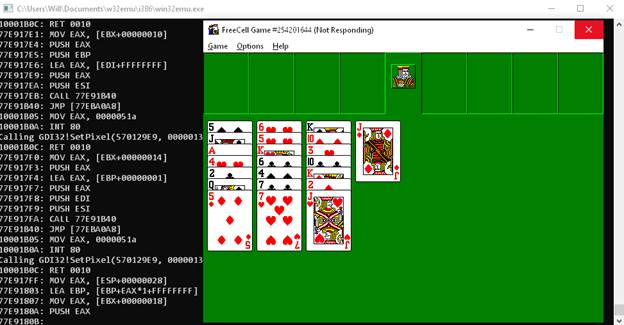
After getting Reversi working essentially perfectly, my next goal was to get FreeCell working. FreeCell was the Win32 test app and bundled with Windows 95 and Win32s and up. It depended on SHELL32.DLL, which I hadnt yet implemented, so I needed to add a few more thunks, but it wasn't too hard. However, there was an inexplicable error - it was crashing somewhere, and I couldnt figure out why. Absent debug symbols for this version of FreeCell, my ability to debug was somewhat limited, so I moved on. A few other apps I had wanted to get working included the Windows NT 3.10 clock applet, the Visual C++ command-line SDK tools (i.e. CL, NMAKE, LINK, etc.) and WinMine.
A few apps immediately ran into problems due to lack of floating-point support - Calc, Aclock, DoomGeneric, and GDIDEMO instantly ran into issues, and short of adding floating point (which I plan to do but which is a significant undertaking for now), thats not exactly a solvable problem.
A Journey of Discovery: Comparing with WoW64
More critical though was a fundamental problem with the design of the thunking layer. As I said earlier, I had implemented custom versions of system DLLs such as USER32, GDI32, and KERNEL32 that simply contained a syscall interrupt out to the host thunk layer. This worked fine for simple applications, but it was quickly becoming unsustainable as I added more and more DLLs and implemented more and more exports for all of them (especially having to maintain continuous syscall numbers through all of them). Needing a special thunk DLL for every single system DLL just wasn't realistic.
One may wonder, then, how exactly the WoW64 subsystem works; obviously, if Microsoft is doing it one way that seems to work pretty well, I should too. Unfortunately, its not so simple. On 64-bit Windows, 32-bit applications run in 32-bit protected mode (or an emulator thereof) as theyd expect and theres a full complement of 32-bit DLLs. Most of these DLLs dont do any funny business - they just call down to lower-level DLLs like GDI32, USER32, KERNEL32, or NTDLL, so their WoW versions can be the same as their IA-32 versions, but some DLLs need to call down to the kernel.
NTDLL.DLL exports the NT native API - mostly just user-mode exports for functions from NTOSKRNL to do things like manage memory, processes, and threads. Most images dont use it directly, but they do depend on KERNEL32 which is essentially a wrapper over NTDLL (and many functions in KERNEL32 forward to NTDLL). Inside of each function is whats called a system call stub. Essentially, it loads registers with a pointer to the function parameters and the syscall ID of the relevant function, and then does an interrupt (or SYSCALL instruction).
The interrupt handler then looks up the syscall ID in the system service dispatch table and executes the relevant function.
GDI in Windows NT 3.x operated in user mode through interprocess communication to the Client-Server Runtime Subsystem (CSRSS), essentially the Win32 subsystem process, but starting in Windows NT 4.0, for speed reasons, GDI and USER were moved into a kernel module called win32k.sys. However, the exports in win32k.sys have no direct user-mode exports - the GDI and USER functions directly syscall to win32k.sys.
Essentially, WoW only needs thunks for kernel calls, avoiding costly transitions into long mode or switches out of an emulation layer. Unfortunately, this solution isnt very workable for me. WoW has the benefit of operating with known versions of both the 32-bit DLLs and the 64-bit DLLs that they thunk to, since a given version of WoW is tied to a given version of Windows, and the syscall stubs are undocumented and change between versions.
Theoretically, I could make a guarantee to operate with a known version of the 32-bit DLL (and thats effectively what I do by making my own), so I at least know what an emulated syscall ID means, but I could be running on any arbitrary version of Windows on the hostside, so resolving the system call would still be troublesome.
I did, however, redo how thunks were done, only thunking KERNEL32, USER32, GDI32, and NTDLL, and autogenerating the thunks using a thunk compiler that takes in a header.
Most functions were just straight-through thunks to their host-side counterparts, but a few needed more work. First of all, any varargs functions such as wsprintf needed to call their wsprintfv counterparts that take in a va_list (I passed in the pointer of the next argument after the format string) since the host and the emulated CPU run on different stacks, any functions dealing with loading libraries need to use the EmuLoadLibrary-family of functions, and any functions dealing with creating windows (or registering window classes), dialog boxes, or timers (anything with a callback) need to be changed to go to a callback thunk procedure, as discussed earlier.
Getting Reversi Working Again!
Once I had Reversi functioning again, I was once again at the point of trying to get more sophisticated applications working. First of all, I knew SHELL32 would be a dependency of most future applications, so I first modified Reversi to use ShellAboutA to display the About dialog box instead of creating its own. I loaded Windows NT 3.51s SHELL32.DLL, which depends on calls from already-implemented DLLs but the dialog box failed to appear. (I had to add shims for ADVAPI32.DLL to let SHELL32 access the registry, which it needs.)
The problem is that SHELL32!ShellAboutW passes in its own HINSTANCE to DialogBoxParamW, but that HINSTANCE is a variable in the data section thats filled in during DLLMainCRTStartup which I didnt execute yet.
To execute DLL entry points, I had to adjust the sequence of events slightly. As before EmuInitProcess creates and initializes a PEB, but instead of then calling EmuLoadLibrary, it instead calls EmuLoadModule, passing in the application name and the PEB pointer, returning a CPU to start executing from.
EmuLoadModule first maps the image into memory, writes relocations, and then writes in heap info into the PEB. It then creates a thread (returning a CPU context object) with the stack info and entry point address of the EXE, and it then begins resolving imports, passing in the CPU object, since at the end of EmuLoadLibrary (which is called inside of resolve_imports), the DLL entry point is called using ThunkCallback. For my thunk DLLs, the entry point is just a RET, but SHELL32.DLL actually has some code in its entry point.
After a bit more debugging work, I finally had a version of Reversi that displayed the Windows NT 3.51 About dialog. After that, getting FreeCell running was just a matter of a few more added functions, added instructions, and it was working but not without its glitches.
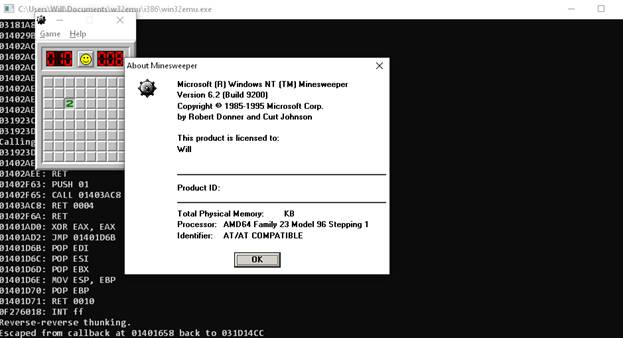
Only a little bit more work was needed to get WinMine running as well, but also not without its issues.
Im working on getting some more Windows NT applets working, such as Clock, Notepad, and Paintbrush (Paint in Windows 95 could possibly be made to work in the future, but due to dependencies on MFC, I dont want to mess with it), but something in the COMDLG32 entry point is causing issues, so its not working quite yet (though I was surprised to see a LOCK CMPXCHG instruction, which wasn't added until the 486, despite NT 3.51 apparently supporting the 386 - it must be emulated through an exception handler?). As it stands, this is still little more than a proof of concept, but progress is being made.
Unjankifying Some Stuff
Side Note: This section
is written under the assumption I would have already done all this work before
the blog post, but Ive been busy and still need to get on this!
I had taken some other miscellaneous shortcuts during development that I also wanted to address. First of all, the CPU had a few clunky issues. First of all, I had stubbed out the FS segment override prefix, so the TEB couldnt actually be addressed. Adding an address override field (that the TEB is dumped into) that is added to Mod R/M memory addresses quickly resolved this.
There was also no debugger. Im no expert, and I certainly dont have the knowledge to do full source-level or even symbolic debugging, but I figured I could at least lift some code from sim386 to add a basic debugger with support for breakpoints, single stepping, and memory and register dumps. The idea was that two things should manipulate the CPUs execution state: fatal errors (i.e. unimplemented instructions) and breakpoints (which are treated as fatal errors when the debugger isnt active). When theres a fatal error, that causes the CPU to return 1 (so execution quits) while if theres a breakpoint, it breaks out into the debugger.
I essentially wrapped the CPUs step function into a debugger step function (that would step the CPU as normal unless it was halted for debugging purposes). One nice thing is that while the debugger does control the CPUs execution, it isnt directly involved with how that execution works, so the code can be common between x86, MIPS, and anything else. The debugger is pretty barebones and simple; you can list, set, and remove breakpoints, dump memory, enter values into memory, dump and set registers, go until a breakpoint, single step, or quit.
There was also a sore lack of error handling - everything would just assume that everything else had worked - if not, a crash was fine since Id just fix it. This permeated everything, especially the PE-related functions. EmuLoadLibrary also needed to be fixed to actually populate the tree in the PEB that contains a list of all loaded modules so GetModuleHandle can work, and EmuLoadLibrary should prevent DLLs from being loaded multiple times.
Adding Support for MIPS
Once I had x86 working, extending the emulator to add support for the MIPS ISA wasn't too difficult. MIPS EXEs did load, but of course the x86 emulator wont be able to run the code. To go on, I obviously first needed a set of MIPS system DLLs (not difficult to source) and new thunk DLLs (which I can generate with a new version of thunk compiler).
The problem came in generating those thunk DLLs. As far as I can tell, no officially released version of the Win32 SDK or Visual C++ for RISC actually includes a MIPS assembler, so I had to hunt one down, with a member of the VirtuallyFun Discord eventually helping point me in the direction of Embedded Visual C++ 4.0, which included development tools for MIPS that I could use to generate MIPS DLLs after adding a MIPS backend to the thunk compiler, which loaded the thunk number into $v0 and then executed the SYSCALL instruction.
With the thunk DLLs in hand, I was then solely confronted with the problem of actually emulating MIPS. Having abstracted away the details of the CPU and its calling convention, I didnt need to modify the thunk layer, only implement the same functions for MIPS.
MIPS is fairly clean - the quintessential RISC ISA, so writing an emulator was extremely simple - simpler than x86. I have previously written a RISC-V emulator for a school project, and the similarities between the ISAs mean that this wasn't a difficult task. The other nice thing about MIPS is that while the development experience for it is certainly not nearly as nice as x86 (since I cant natively compile or execute or debug MIPS executables on my machine), it does have the benefit of being emulated, so its still easier than Alpha or PowerPC. The bedrock of this work will definitely pay off for the other RISC architectures. Right now, I have the start of the MIPS emulator and a MIPS backend for the thunk compiler.
Writing an emulator for most of the base MIPS 32-bit user mode integer ISA didnt take long, but I quickly ran into issues when I tried to execute code - it was crashing inside of SHELL32s entry point. I realized I was bumping up against a nasty implementation detail of the MIPS architecture. Due to the design of the pipeline, the instruction immediately following a branch is always executed, regardless of whether the branch is taken. To get around this, I added a pseudo-register to represent the delay slot. Every tick, instead of fetching the next instruction from memory pointed to by the PC, I instead fetch the instruction from the delay slot, and then fetch the next instruction to be put into the delay slot from memory. I print out the current instruction in the delay slot and the current instruction in the instruction register, and you can see the instruction in the delay slot cascading down to the IR on the next cycle. For branches that are expected to be taken, there are branch likely instructions, that nullifies (i.e. NOPs out) the delay slot if the branch isnt taken. This behavior is puzzling to me, since Id expect it to nullify the delay slot if the branch is taken, since that would more closely mimic the linear execution model of other processors where the branch is taken immediately, with no delay.
At this point, the emulator got through SHELL32s DLL entry point, but crashed shortly after creating the heap in Reversis CRT initialization. Moreover, if the image didnt get its desired base address, it crashed even earlier. I had implemented support for PE relocations, but not in a way that worked for MIPS. On x86, 32-bit addresses are given as 4-byte immediate quantities, so the 32-bit quantity at a given address can be added with the delta to perform the fixup. This is the HIGHLOW relocation type, and its the only one commonly seen in x86 applications, but rarely seen in MIPS, except maybe to fix up jump tables.
To load an immediate into a register usually takes two instructions, a LUI (load upper immediate) instruction to load a 16-bit immediate into the upper half of a register (i.e. shifted left by 16) and then an ORI with the lower half. However, since PE images are always loaded on 64K boundaries, only the upper half ever changes, so the fixup only needs to apply to the LUI, using the HIGH relocation type, which adds the upper half of the delta to the 16-bit quantity at the fixup address (i.e. the lower half of the 32-bit word; the immediate field). To fix up immediate jumps (which encode a 26-bit immediate field which is shifted left by 2 and then ORed with the upper 4 bits of the PC to produce a target address), the MIPS_JMPADDR relocation type is also used, which shifts the delta right by two and adds it. My work in fixing rebasing should come in handy for the other RISC architectures.
Not all EXEs have relocations, since theyre expected to be loaded first into the address space and always get their desired image base, so its pretty important to make sure they can get their desired base. This isnt an entirely solved problem, since I dont have full control over the virtual memory layout after Windows loads the emulator, but I can strategically choose the emulators image base to make conflicts unlikely.
I fixed the branch likely instructions, but there was still one more issue to fix - I had to subtract four from any calculated branch target, due to the order in which the PC was incremented relative to how instructions executed from the delay slot. Otherwise, branches would go to the wrong place, causing crashes. After the fix, it finally worked!
In fact, all of my emulation problems throughout development had come from MIPS delay slots. My implementation was awkward, but it does work.
The pride I felt from seeing Reversi for MIPS start up on an x86 platform through what is essentially a homebrewed version of WoW was immeasurable - this was the ultimate proof of my concept (well, technically, the ultimate proof would be CL, or perhaps Doom running, but thisll do for now). Obviously, my work is far from over, but the source code repo includes the current MIPS support code. Theres still some rebasing issues, though.
The Future
Id encourage someone to write a CPU module for the DEC Alpha AXP (or even PowerPC if anyone for some reason wants that). The API isnt too complicated, and the i386 emulator is available for reference to see how the CPU emulator interfaces with the Win32 thunking side. An Alpha backend for the thunk compiler can definitely be written without too much trouble. Obviously, the AXP presents the challenge that fewer people are familiar with its instruction set than MIPS or 386, but this approach does free one from having to emulate all of the intricate hardware connections in actual Alpha applications while still running applications designed for it, and Ive heard the Alpha is actually quite nice and clean. MAMEs Digital Alpha core could be a good place to start, but itll need some adaptation to work in this codebase. Remember that while being a 64-bit CPU with 64-bit registers and operations, the Alpha still runs Windows with 32-bit pointers, so it should run in a 32-bit address space (i.e. pass /LARGEADDRESSAWARE:NO to the linker).
Theoretically, recompiling the application to support the full address space should enable emulation of AXP64 applications, since the Alphas 64-bit pointers will allow it to address the hosts 64-bit address space, but Im not sure if my emulator is totally 64-bit clean, or if the AXP64s calling convention is materially different from that on the AXP32 in such a way that would require substantial changes. In either case, most of the code should still be transferable.
I also want to get more useful applications running, like development tools (i.e. the MSVC command line utilities - CL, MAKE, LINK, etc.) and CMD. Most of that probably involves implementing more thunks and potentially fixing CPU bugs.
This project is obviously still in a quite early stage, but Im hoping to see it grow and become something useful for those in the hobby.